RSX Hood Vent Installation:
The addition of a hood vent to your RSX will solve several design flaws that must be overcome when using a coupe or sedan for racing and track driving. To take a deep dive into some of the nuances of internal aerodynamic design, and to understand how a hood vent will affect your cars performance, check out our article in our design recourses. This guide will focus only on the installation of the Simple Speed center hood vent.
Details:
Installation time: 2 hours
Difficulty: Intermediate
Tools Needed: Tape Measure, Square, Drill, Angle Grinder or Air Saw, Rivet Gun
Additional Materials: 1/8" aluminum rivets (x32)
Step 1: Layout
First, lay down some masking tape and mark a line down the center of your hood. The best method is to mark the center of the top and bottom of the hood, and connect the dots with a string or flexible straight edge.
Next, make a mark at the bottom of your cutout. We recommend a distance of 14.5" from the front tip of the hood for proper placement.
Finally, lay down some more tape and draw the outline of your cutout. This hole on the hood of your RSX should measure 15.5" wide at the front, 19.75" at the back, and should be 10.75" tall. Make sure to keep all of your lines as square as possible. To double check, just measure the diagonals of your cutout, they should equal each other.
When you are finished, your hood should resemble the picture below.

Step 2: Making the Cuts
First, lay down welding blanket or tarp over your engine to prevent any metal shavings from getting in your engine bay. Next, drill 0.25" holes in each corner to keep them looking neat. The holes should be places on the inside of the line like the picture below. Although the holes can be drilled with a twist drill, we recommend using a step bit whenever drilling though sheet metal.

Once your holes are drilled its time to cut along the lines your drew. Depending on the tool you may need to finish up the cuts from the bottom of the hood. File or sand down the sharp edges and make sure to use a paint marker over any exposed metal to prevent rusting.

Step 3: Rivet the Hood Vent On
Remove all the masking tape and align the hood vent into place. It may be helpful to bend the louvers slightly to check alignment. Once the hood vent is in place, start drilling your holes and installing your rivets. It is best to drill one hole at a time and install its rivet before moving on.
Work from the inside out to prevent warping, alternating between the top and bottom holes. Your first two rivets should look like the picture below.

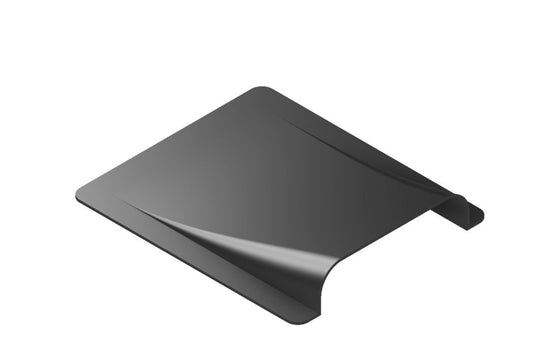
When all the rivets are in, finish bending the louvers and the installation is complete. The shorter, front tab should bend upward while the rest bend down into the engine bay. The final product should resemble the picture below.

That's all there is to it. Don't forget to share pictures of your new hood vent and tag us @thesimplespeed on Instagram so we can check it out!